A Guide to Use Sessions in Flask App for Storing Data Temporarily

I am a self-taught Python developer who loves to write on Python Programming and quite obsessed with Machine Learning.
In this article, you'll see what are sessions and how to utilize them in a Flask application to store information.
What are Sessions?
In general, a session is an active period of interaction between the user and the application. The entirety of the session is the time the user spends on an application from logging in to logging out.
Sessions can store and manage data across multiple requests. Sessions are particularly useful for managing user-related data and maintaining it between different interactions of a web application.
For instance, you can store the authentication status (whether the user is logged in or not) of the user on the server when the user logs in. Storing this information in a session allows the server to remember that the user is authenticated even as they navigate through different parts of the web application.
Using Sessions in a Flask App
To use sessions to store data on the server using the Flask app, you can use the flask module's session.
Importing Required Modules
# Importing required modules
from flask import session
from flask import Flask, render_template, request, redirect, url_for
from datetime import timedelta
The session is imported from flask which will be used to access and manipulate session data in a Flask application.
The other functions and classes are imported from flask which will help in creating a Flask application and handling routes.
The timedelta class is imported from datetime module which will help in calculating time intervals.
Setting Up Flask App
# Creating Flask App
app = Flask(__name__)
# Setting up Secret Key for Session Management
app.secret_key = "MY_SECRET_KEY"
The Flask application is created by instantiating the Flask(__name__) and storing the instance in the app variable.
The secret key is set to "MY_SECRET_KEY" by calling the app object's secret_key attribute. This will assist with session management.
Setting Up Session Timeout
# Setting Lifetime of Sessions
app.permanent_session_lifetime = timedelta(minutes=1)
The session timeout is set to one minute (timedelta(minutes=1)) by calling the app object's permanent_session_lifetime. After one minute, the active sessions will be terminated automatically.
Routes and View Functions
In this section, you will create routes and view functions for registering users, displaying relevant messages for the request, and storing them on the server via sessions. You'll then create a route and view function to remove the username from the session.
Home Route and View Function
# Home Route
@app.route("/")
def home():
    return render_template("home.html")
This simple code defines the route ("/") and a view function called home that displays the home.html template.
Route and View Function for Registering Username
# Route for Registering Username
@app.route("/add", methods=["GET", "POST"])
def add_username():
    session['message'] = "Enter your username to continue."
    if request.method == 'POST':
        username = request.form['username']
        session['user'] = username
        session['greet'] = f"Successfully registered username - {session['user']}."
        return redirect(url_for("home"))

    return render_template("add_username.html")
The "/add" route, which can handle both GET and POST requests, is defined in this code snippet.
The view function add_username() is defined, and it is in charge of displaying the add_username.html template. A message is stored in the session using session['message'] within the view function body.
The function then determines whether the request is a POST request and retrieves the value of "username" from the form within that conditional block. Using session['user'] = username, the retrieved username is saved in the session under the key 'user'.
After that, a message is saved in the session under the key 'greet' to notify users of their successful username registration, and the user is redirected to the home route.
Route and View Function for Removing Username
# Route for Removing Username
@app.route("/remove")
def remove_username():
    session.pop('user')
    session['notify'] = "Username Removed from Session Storage."
    return redirect(url_for("home"))
The code defines a "/remove" route and a remove_username view function.
Using session.pop('user'), the view function removes the username from the session. Following that, a message is saved under the key 'notify' to notify users that the username has been removed from the session and then they are redirected to the home page.
Creating Templates
You need to generate three HTML templates named base.html, home.html, and add_username.html within the templates directory.
base.html
This template includes an HTML skeleton as well as Bootstrap CSS and JavaScript.
<!doctype html>
<html lang="en">
<head>
    <meta charset="utf-8">
    <meta content="width=device-width, initial-scale=1" name="viewport">
    <link crossorigin="anonymous" href="https://cdn.jsdelivr.net/npm/bootstrap@5.1.3/dist/css/bootstrap.min.css"
          integrity="sha384-1BmE4kWBq78iYhFldvKuhfTAU6auU8tT94WrHftjDbrCEXSU1oBoqyl2QvZ6jIW3" rel="stylesheet">

    <title>Session in Flask</title>
</head>
<body>
{% block content %} {% endblock %}
<script crossorigin="anonymous"
        integrity="sha384-ka7Sk0Gln4gmtz2MlQnikT1wXgYsOg+OMhuP+IlRH9sENBO0LRn5q+8nbTov4+1p"
        src="https://cdn.jsdelivr.net/npm/bootstrap@5.1.3/dist/js/bootstrap.bundle.min.js"></script>
</body>
</html>
home.html
{% extends "base.html" %}

{% block content %}
{% if not session['user'] %}
<div class="alert alert-success alert-dismissible fade show" role="alert">
    {{ session['notify'] }}
    <button aria-label="Close" class="btn-close" data-bs-dismiss="alert" type="button"></button>
</div>
{% else %}
<div class="alert alert-success alert-dismissible fade show" role="alert">
    {{ session['greet'] }}
    <button aria-label="Close" class="btn-close" data-bs-dismiss="alert" type="button"></button>
</div>
{% endif %}

<div class="container">
    <h1>Welcome To GeekPython!</h1>
    {% if session['user'] %}
    <h3>Hi🖐, {{ session['user'] }}!</h3>
    <div class="my-3">
        <a class="btn btn-info mb-3" href="{{ url_for('remove_username') }}">Log out</a>
    </div>
    {% else %}
    <h3>You Need to Register First!</h3>
    <a class="btn btn-info mb-3" href="{{ url_for('add_username') }}">Register</a>
    {% endif %}
</div>

{% endblock %}
In the above code snippet, the {% if not session['user'] %} block checks if there is no username and displays the message stored in the session under the key 'notify' otherwise displays the message stored in the session['greet'].
The {% if session['user'] %} block checks if there is a username, it displays the username with a "Log out" button otherwise displays the "Register" button to register the username.
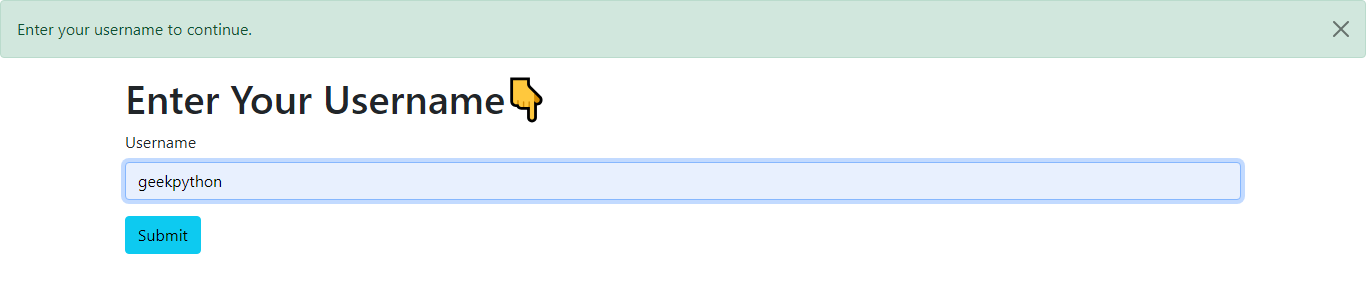
add_username.html
{% extends "base.html" %}

{% block content %}
<div class="alert alert-success alert-dismissible fade show" role="alert">
    {{ session['message'] }}
    <button aria-label="Close" class="btn-close" data-bs-dismiss="alert" type="button"></button>
</div>
<div class="container">
    <h1>Enter Your Username👇</h1>
    <form action="/add" method="post">
        <div class="mb-3">
            <label class="form-label" for="name">Username</label>
            <input class="form-control" id="name" name="username" type="text">
        </div>
        <button class="btn btn-info" type="submit">Submit</button>
    </form>
</div>
{% endblock %}
This template includes a form with a username field and a "Submit" button to submit the username and save it in the session. At first, a message is displayed on the request to the "/add" URL, which is saved in the session under the key 'message'.
Demonstration
Here are some screenshots of testing the routes.
- Default or Home page preview.

- Adding username and submitting the form.
- Username registered

- The username was removed from the session

How to use Flask-Session
Flask-Session is an extension of Flask that offers extra support for managing sessions in the Flask application. It is designed to enhance the capability of session handling by providing various session storage types and configurations in Flask.
Installation
You need to install the package before implementing it in the Flask application. You can install it by running the following command using pip (Python Package Manager).
pip install Flask-Session
Implementation
# Importing required modules
from flask import session
from flask_session import Session
from flask import Flask, render_template, request, redirect, url_for

# Creating Flask App
app = Flask(__name__)
# Setting up Secret Key for Session Management
app.secret_key = "MY_SECRET_KEY"

# Configuring Session
app.config['PERMANENT_SESSION_LIFETIME'] = 60  # Session Lifetime
app.config['SESSION_TYPE'] = "filesystem"  # Session Storage Type

# Path to Storing Session
app.config['SESSION_FILE_DIR'] = "session_data"

# Initializing the Session Extension
Session(app)

# Remaining Code
The code from earlier is modified to use the Flask-Session. The changes to the code are listed as follows:
from flask_session import Session: TheSessionclass is imported from theflask_sessionmodule.app.config['PERMANENT_SESSION_LIFETIME']: ThePERMANENT_SESSION_LIFETIMEconfiguration is used to set the expiration time of the active session.app.config['SESSION_TYPE']: This is used to set the session storage type. In this case, the storage type is set to"filesystem"which means that the session data will be stored in the server's filesystem.app.config['SESSION_FILE_DIR']: This is used to set the path to the directory where the session data will be stored.Session(app): The Flask-Session is initialized with the Flask application (app). This will connect the Flask-Session with theappand all the configurations will be applied.
Most Commonly Used Configuration Keys
The following are the most commonly used configuration keys provided by Flask-Session.
| Configuration Key | Description |
| SESSION_TYPE | Specifies which type of session interface to use. Built-in session types: |
| - null: NullSessionInterface (default) | |
| - redis: RedisSessionInterface | |
| - memcached: MemcachedSessionInterface | |
| - mongodb: MongoDBSessionInterface | |
| - sqlalchemy: SqlAlchemySessionInterface | |
| SESSION_PERMANENT | Whether use permanent session or not, default to be True |
| PERMANENT_SESSION_LIFETIME | The lifetime of a permanent session in seconds |
| SESSION_FILE_DIR | The directory where session files are stored. Default to use the flask_session directory under the current working directory. |
Flask-Session provides additional configuration keys that eventually enhance the capabilities of the session provided by Flask. You can refer to the official docs for more.
Conclusion
The session is the duration of a user's interaction with an application, beginning with logging in and ending when the user logs out. During this time, the application is able to store and manage user-specific data across multiple requests.
Flask session can be used to store and manage data on the server, and Flask-Session can be used to extend the flask session's capability.
Let's recall what you've learned:
What is a session?
How to use
sessionin Flask by creating a Flask app and storing user-related data in the session.How to use Flask-Session to add additional application configurations such as session storage type and directory.
🏆Other articles you might be interested in if you liked this one
✅How to display messages using flash() in Flask app?
✅How to structure Flask app using Blueprint?
✅Upload and display images on the frontend using Flask in Python.
✅How to unit testing of the code in Python using unittest module?
✅How to connect the SQLite database with the Flask app using Python?
✅How to implement __getitem__, __setitem__ and __delitem__ in Python?
That's all for now
Keep Coding✌✌