How to Create and Integrate MySQL Database with the Flask App

I am a self-taught Python developer who loves to write on Python Programming and quite obsessed with Machine Learning.
MySQL is a widely used open-source relational database known for its performance, reliability, and scalability. It is suitable for various types of software applications, including web applications, e-commerce platforms, and content management systems.
In this article, you'll learn how to create and integrate a MySQL database with a Flask application using the PyMySQL driver, which provides convenient access to MySQL databases within the Flask framework.
Pre-Requisite
You must have Python, Flask, and MySQL installed in your system and have a basic understanding of the Flask framework, Jinja templating, and SQL.
Install PyMySQL Package
You must have the PyMySQL package installed in your project environment before proceeding with this tutorial.
To install the PyMySQL package in your local or virtual environment, open a terminal window and type the following command. It will be used to create and connect the MySQL database to your Flask app.
pip install PyMySQL
Creating MySQL Database using PyMySQL
The PyMySQL library makes it easy to interact with MySQL databases. It enables Python applications to connect to and manipulate MySQL databases. In this section, you'll use the PyMySQL library to create a MySQL database.
Unlike SQLite database, you need to set a username, password, and hostname of the MySQL database using the configuration keys.
import pymysql

hostname = 'localhost'
user = 'root'
password = 'your_password'

# Initializing connection
db = pymysql.connections.Connection(
    host=hostname,
    user=user,
    password=password
)

# Creating cursor object
cursor = db.cursor()

# Executing SQL query
cursor.execute("CREATE DATABASE IF NOT EXISTS books_db")
cursor.execute("SHOW DATABASES")

# Displaying databases
for databases in cursor:
    print(databases)

# Closing the cursor and connection to the database
cursor.close()
db.close()
The pymysql library has been imported and will be used to connect to the MySQL server and create the database.
The connection to the MySQL server is initialized using the pymysql.connections.Connection object with required credentials such as hostname, username, and password. The instance is then stored inside the db variable.
The cursor object of the db is created and stored inside the cursor variable to interact with the MySQL database.
The first SQL query creates a books_db database on the MySQL server, if no such database exist.
The second SQL query uses the SHOW DATABASES statement to retrieve a list of databases on the MySQL server. This query's output is then iterated over and printed.
In the end, the cursor and database connection is closed using the cursor.close() and db.close() respectively.
('books_db',)
('information_schema',)
('mysql',)
('performance_schema',)
('sakila',)
('sys',)
('world',)
As can be seen in the output, a database named books_db is created on the MySQL server.
Integrating MySQL Database with Flask App
In this section, you'll learn to integrate MySQL database with your Flask app and create a model using SQLAlchemy.
Flask App and SQLALchemy Setup
from flask import Flask, render_template, request, redirect, url_for
from flask_sqlalchemy import SQLAlchemy

# Creating Flask app
app = Flask(__name__)

# Creating SQLAlchemy instance
db = SQLAlchemy()
The above code imports the Flask class as well as the flask module's render_template, request, redirect, and url_for methods and functions. The SQLAlchemy is then imported from the flask_sqlalchemy module.
You need to install the Flask-SQLAlchemy library if you haven't installed already.
Run
pip install Flask-SQLAlchemycommand in your terminal to install this dependency.
The Flask app is created by instantiating the Flask class with the value __name__ and storing it in the app variable.
The SQLAlchemy (SQLAlchemy()) instance is created and stored inside the db variable.
Configuring MySQL Database Connection URI
user = "root"
pin = "your_password"
host = "localhost"
db_name = "books_db"

# Configuring database URI
app.config['SQLALCHEMY_DATABASE_URI'] = f"mysql+pymysql://{user}:{pin}@{host}/{db_name}"

# Disable modification tracking
app.config['SQLALCHEMY_TRACK_MODIFICATIONS'] = False
The database connection parameters are defined first. These variables store the database connection parameters, such as MySQL username (user), MySQL password (pin), hostname (host), and database name (db_name) to connect to.
The following line of code sets up the SQLAlchemy database URI to connect to the MySQL database. The URI is broken down as follows:
mysql+pymysql://: This means that thePyMySQLdriver is to be used.username: This is to specify the username and this will be replaced with the value of theuservariable.password: This will be replaced with the value of thepinvariable.hostname: This will be replaced with the value of thehostvariable.database_name: This will be replaced with the value of thedb_namevariable.
In the end, the modification tracking is disabled using the app.config['SQLALCHEMY_TRACK_MODIFICATIONS'] = False configuration.
Initializing Flask App with SQLAlchemy
# Initializing Flask app with SQLAlchemy
db.init_app(app)
The SQLAlchemy instance (db) is initialized using the init_app() method with the Flask app (app).
Creating a Database Model
# Creating Models
class Books(db.Model):
    __tablename__ = "books"

    id = db.Column(db.Integer, primary_key=True)
    title = db.Column(db.String(500), nullable=False, unique=True)
    author = db.Column(db.String(500), nullable=False)
The code creates a SQLAlchemy model class (Books) that represents a database table. The __tablename__ specifies the name of the table (books).
Within the table, three columns are created: id, title, and author. The db.Column function is used to define database columns.
id: Theidcolumn is of type integer (db.Integer) and is a primary key (primary_key=True) which means it will be unique for each row.title: It is of type string (db.String) and it cannot be left empty (nullable=False) and it will contain unique values (unique=True).author: It is of type string (db.String) and cannot be left empty (nullable=False).
Creating Table in MySQL Database
def create_db():
    with app.app_context():
        db.create_all()
The above code defines the function create_db(), which is used to create a table (books) within the MySQL database (books_db). Flask app (app) is run within the application context within this function to ensure that it has access to the Flask app and its configuration.
Within the context block, create_all() method is called on the SQLAlchemy instance (db) to create the table defined by the SQLAlchemy model class (Books).
Database Operation - Adding Data Using Flask App
Now that the MySQL database and table have been created, it is time to see if they work and if data can be added to the database. You can do this manually with MySQL workbench or other applications, but you'll do it programmatically with the Flask framework on the frontend.
Creating Backend Logic
# Home route
@app.route("/")
def home():
    details = Books.query.all()
    return render_template("home.html", details=details)


# Add data route
@app.route("/add", methods=['GET', 'POST'])
def add_books():
    if request.method == 'POST':
        book_title = request.form.get('title')
        book_author = request.form.get('author')

        add_detail = Books(
            title=book_title,
            author=book_author
        )
        db.session.add(add_detail)
        db.session.commit()
        return redirect(url_for('home'))

    return render_template("books.html")
The above code defines two routes "Home" and "Add data" route for displaying and adding the books detail.
Home Route:
The user can access the Home route by using the root URL
"/", and when the user accesses the root URL, thehome()function is executed.Using
Books.query.all(), thehome()function retrieves all records from the database table.The
detailsvariable is then used to pass all of the records to thehome.htmltemplate, and the template is then rendered.
Add data Route:
Users can add data to the database table by visiting the
"/add"URL path, which accepts bothGETandPOSTrequests.When users enter the URL path or make a GET request, the
books.htmltemplate is rendered, which includes a form with two fields.The
add_books()function is defined, and this function handles the user'sPOSTrequest.The
request.form.get()method is used to retrieve the value of thetitleandauthorfrom the form, which is then passed to the database table fields (titleandauthor).Then, using the
db.session.add()method, all the details are added to the database, and the changes are committed to the MySQL database using thedb.session.commit()method.When all of this is completed, users are redirected to the home page via the
url_for()method.
Running the Script
if __name__ == "__main__":
    create_db()
    app.run(debug=True)
The above code will call the create_db() function, which will create the table within the database and the app.run() will launch the Flask app on the localhost server.
However, first, you must create the HTML template for the frontend.
Creating Frontend using BootStrap
Create a directory named templates in the root of your project directory and within this directory create three HTML files:
base.html
home.html
books.html
Using the Jinja templating, the data from the database will be displayed.
base.html
<!doctype html>
<html lang="en">
  <head>
    <!-- Required meta tags -->
    <meta charset="utf-8">
    <meta name="viewport" content="width=device-width, initial-scale=1">

    <!-- Bootstrap CSS -->
    <link href="https://cdn.jsdelivr.net/npm/bootstrap@5.1.3/dist/css/bootstrap.min.css" rel="stylesheet" integrity="sha384-1BmE4kWBq78iYhFldvKuhfTAU6auU8tT94WrHftjDbrCEXSU1oBoqyl2QvZ6jIW3" crossorigin="anonymous">

    <title>{% block title%} {% endblock %}</title>
  </head>
  <body>
    {% block content %} {% endblock %}

    <script src="https://cdn.jsdelivr.net/npm/bootstrap@5.1.3/dist/js/bootstrap.bundle.min.js" integrity="sha384-ka7Sk0Gln4gmtz2MlQnikT1wXgYsOg+OMhuP+IlRH9sENBO0LRn5q+8nbTov4+1p" crossorigin="anonymous"></script>
  </body>
</html>
This HTML file contains the Bootstrap CSS and JavaScript CDN (Content Delivery Network). You can see some Jinja templating, this is for injecting content in the body section and dynamic title without using the basic HTML structure again.
home.html
{% extends 'base.html' %}

{% block title %}
Home of Books
{% endblock %}

{% block content %}
<h1 class="text-center my-5">📚Books Detail📚</h1>
<div class="container d-flex justify-content-center align-items-center">
    <a class="btn btn-outline-info mb-3" href="{{ url_for('add_books') }}">Add Books</a>
</div>
<div class="container">
    <table class="table table-dark table-striped">
        <thead>
        <tr>
            <th scope="col">ID</th>
            <th scope="col">Book Title</th>
            <th scope="col">Author</th>
        </tr>
        </thead>
        {% if not details%}
        <div class="text-center">
            <h3 class="my-5">No Records to Display!</h3>
        </div>
        {% else %}
        <tbody>
        {% for data in details %}
        <tr>
            <th scope="row">{{data.id}}</th>
            <td>{{data.title}}</td>
            <td>{{data.author}}</td>
        </tr>
        {% endfor %}
        </tbody>
        {% endif %}
    </table>
</div>
{% endblock %}
In this template, base.html template is used as a layout using {% extends 'base.html' %} and page title is set with the title block and within the content block, data stored in the database (details) is iterated and displayed in the table format using the Bootstrap.
books.html
{% extends 'base.html' %}

{% block title %}
Add Books
{% endblock %}

{% block content %}
<h1 class="text-center my-5">📚Book Details📚</h1>
<div class="container">
  <a href="{{ url_for('home') }}" class="btn mb-3 btn-outline-info">Go to Home</a>
  <form action="/add" method="POST">
<div class="mb-3">
  <label for="title" class="form-label">Title</label>
  <input type="text" class="form-control" name="title" id="title" placeholder="Title of the book" required>
</div>
<div class="mb-3">
  <label for="author" class="form-label">Author</label>
  <input type="text" class="form-control" name="author" id="author" placeholder="Author of the book">
</div>
  <button type="submit" class="btn mt-3 btn-outline-success">Add Book</button>
  </form>
  </div>
{% endblock %}
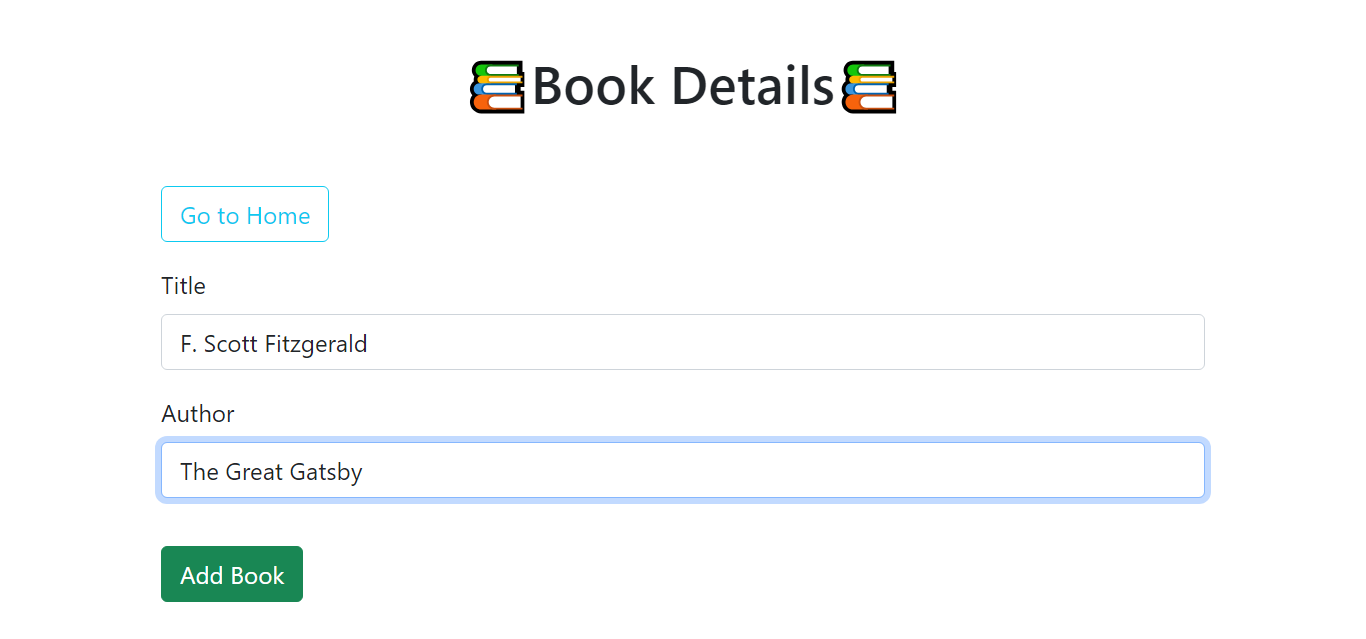
This HTML file contains a form with two input fields (Title and Author) and a submit button ("Add Book"). This form will be submitted on the "/add" URL (action="/add") and "method="POST"" specifies that POST HTTP method to be used.
Adding Data Using Frontend
Run your app.py file, or whatever you named your main Flask app file, and navigate to http://localhost:5000 to access the frontend.
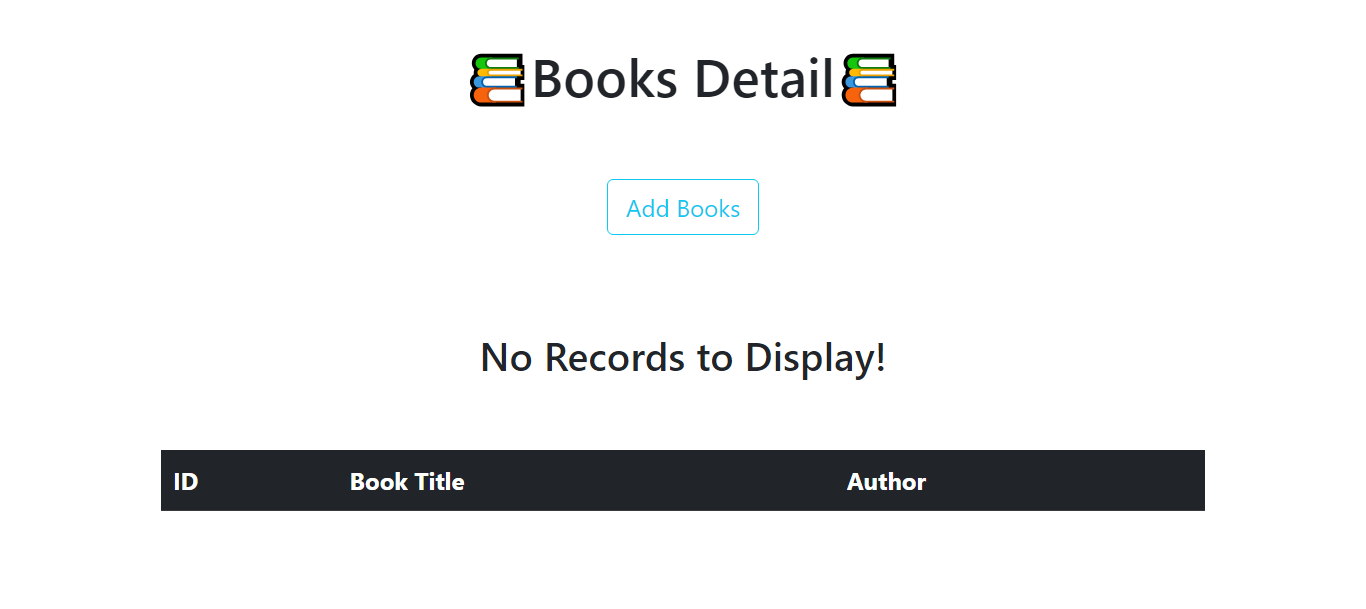
You will see a homepage with no records displayed, as shown in the image below. You must first enter the data on the "/add" URL or by clicking the "Add Book" button on the homepage.
This is the page where you will enter your book information and submit the form. The submitted information will be entered into the database.
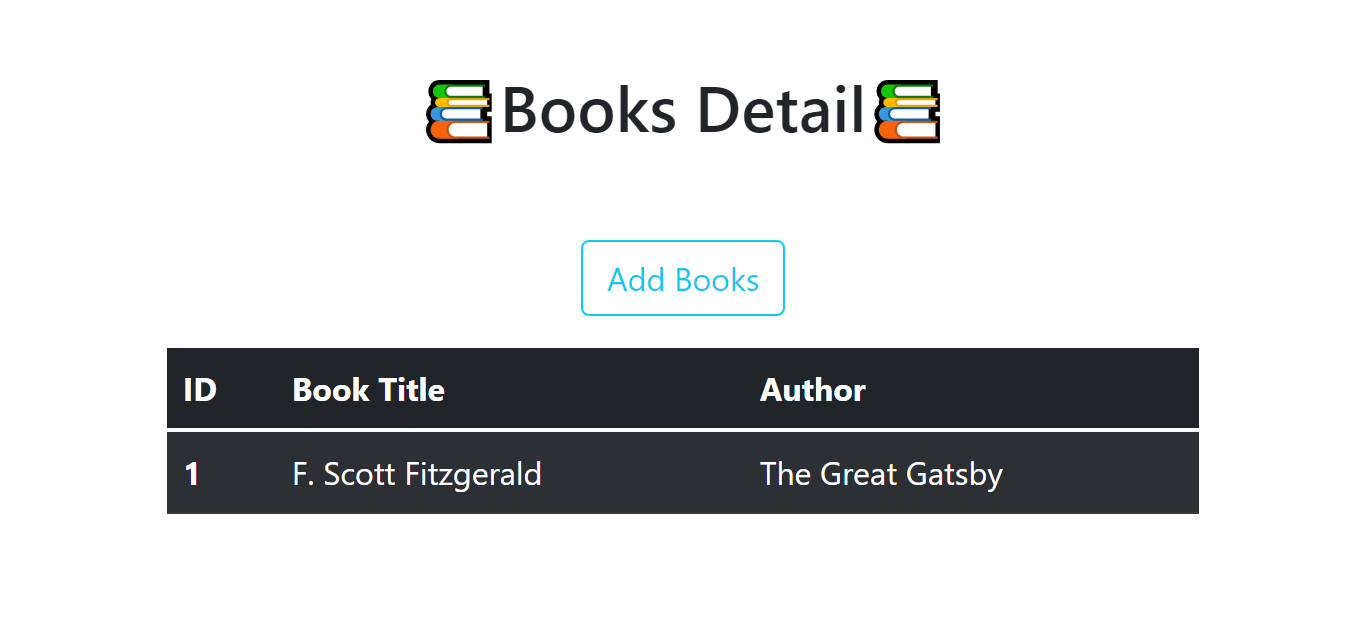
After clicking the "Add Book" button, you'll be taken to the homepage, where your entered data will be displayed.
Conclusion
The PyMySQL driver is used in this tutorial to connect to the MySQL server and create the MySQL database after connecting to the MySQL server by executing the raw SQL query.
The Flask app then defines the database connection URI string, and SQLAlchemy is initialized with the Flask app.
The SQLAlchemy is then used to create a table within the database in an object-oriented way using Python class. The backend is designed to handle database operations, while the frontend is designed to add data to the MySQL database and display it on the homepage.
🏆Other articles you might be interested in if you liked this one
✅How to create and connect SQLite database within Flask app.
✅Structure your Flask app with Flask Blueprint.
✅Upload and display images on the frontend using Flask.
✅What is session in Flask and how to use it for storing temporary details on the server?
✅How to display user-specific messages on the frontend using flash in Flask.
✅How to create a database on Appwrite cloud using only Python.
That's all for now
Keep Coding✌✌